Democratic Underground Latest Greatest Lobby Journals Search Options Help Login
Google

How difficult is it to swap out an existing sink faucet?

Printer-friendly format Printer-friendly format
Printer-friendly format Email this thread to a friend
Printer-friendly format Bookmark this thread
Home » Discuss » DU Groups » Home & Family » DIY & Home Improvement Group Donate to DU
 
SiouxJ Donating Member (1000+ posts) Send PM | Profile | Ignore Wed Apr-27-05 09:46 AM
Original message
How difficult is it to swap out an existing sink faucet?
Edited on Wed Apr-27-05 09:47 AM by SiouxJ
I'm pretty handy but I've pretty much stayed away from plumbing until now. I'm painting my master bathroom and I want to get some new faucets, lighting fixtures and towel rods that will go more with the new paint. Right now I have all chrome fixtures and I want to switch to bronze ones. The lights and rods are no problem for me to swap but the sink is intimidating to me. Is it just a matter of loosening some bolts under the sink and popping off the faucets? These are those one part type faucets; you know, the kind with one control for the hot and cold water, connected to the faucet? Basically, it's just one piece on each of the two sinks, so I'm tempted to try it. Any tips or suggestions are appreciated.
Refresh | 0 Recommendations Printer Friendly | Permalink | Reply | Top
Stinky The Clown Donating Member (1000+ posts) Send PM | Profile | Ignore Wed Apr-27-05 02:09 PM
Response to Original message
1. Its pretty easy, but .......
Edited on Wed Apr-27-05 02:17 PM by Husb2Sparkly
access to the underside may or may not requite some difficult contortions. This diagram shows a typical faucet (this one's an 8" center kitchen faucet, but your bathroom faucet is quite similar except for the spread - yours is 4")


The only part of this diagram that's important is at the bottom. The 'nuts and washers' are what hold it in place. The 'coupling nuts' are what attach to the water supplies (one hot and one cold).

The first thing you need to do is shut off the water supply. You should have two valves below the sink - one for hot and one for cold. See the upper right picture in the illustration below.


Turn them both off. And here's where you could get into trouble. These are often frozen in place. Resist the temptation to use a pliers on their handle or stem. If yours is 'frozen', turn the large nut just below the handle. Not much ... a quarter turn or so is all you need. What you're doing is relieving pressure on the internal packing. That should allow the handle to turn and allow you to shut off the water.

Look at this illustration of just the valve alone .....


The handle's on the right. **Immediately** to the left of the handle in the illustration is the 'nut' I'm talking about. That compresses the valve's packing. That's the one you want to loosen ... just a bit .... until the handle can turn and shut the water off. Leave the sink faucet open when you do this so you can see if the water's off or not. You want to get it so there's not even an occasional drip. If you get a **very** slow drip, you can probably still do the job, but keep a pan below the valve to catch the water that drips.

Once the water's off, disconnect the water supply pipe that runs from the shut off valve to the faucet (that is, to the 'coupling nut' in the illustration at the very top of this post).

If you have rigid supply pipes, I'd suggest replacing them with the heavy duty braided steel type. You can get these at a home store (like Lowes ... or a local Ace Hardware ... or if you really, really must Home Depot(R) Bushbot). They also make a similar pipe in reinforced plastic. These are okay, but I think the braided steel is better. You can see the braided steel in the third picture I posted. These flex supply pipes use a compression fitting and should fit directly into your shut off valve. Ask the guy at the hardware store to be sure you get the right fitting.

When you go to remove the faucet from the sink, it may just lift off or it may seem to be glued in place. Done properly, the faucet is set onto a bead of plumber's putty. That usually stays pliable a long, long time, but it could have hardened. So you may have to pry the faucet up. Just be sure you're prying putty only and not some hidden additional mounting nut.

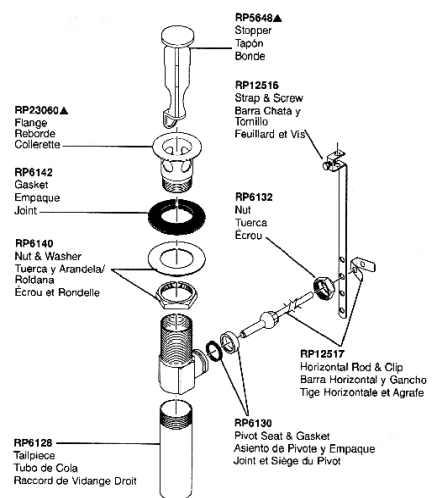
You also need to disconnect the drain stopper. This should be very easy. This illustration shows the entire drain. The only part that concerns you is the 'horizontal rod and clip' (lower right of the illustration). In fact, you only need to worry about the clip. It is a spring that you can squeeze and get off with just your fingers. The faucet will tell you how to attach your faucet to this rod. It is very easy and there's no need to go further here (each manufacturer is slightly different ... but again ... its easy).


When you install the new faucet, I suggest you attach the supply pipe to the faucet before you put the faucet on the sink. When off the sink, there's no access issues. When the faucet's on the sink, it may be next to impossible to reach the underside fo the faucet to attach these supply pipes.

Also, make sure you have plumber's putty if the faucet says to use it. If you don't have any, it is very cheap ... a few bucks for two lifetime supplies. You may also need teflon tape ... depends on teh type of fitting your new faucet has. If it has pipe fittings, you may need it. If it has compression fittings, you won't. Ask the guy who you buy it from. Some 'pipe' fittings are actually designed to use either compression fittings or the old style.

Now, all this being said, the best source of detailed explanation - an pointers for **your** specific circunstances - is the hardware store. This is a simple, routine job well with the skill of any homeowner. Whoever sells you the parts should be able to explain the installation.

Have fun!

On edit ... there are two basic types of single control faucets ... this one:


.... where the mounting nuts and the water supplies are separate things ..... and this one .....


.... where the water supply has the mounting nuts right on it. Different designs, to be sure, but the installation is essentially the same.
Printer Friendly | Permalink | Reply | Top
 
ernstbass Donating Member (1000+ posts) Send PM | Profile | Ignore Wed Apr-27-05 03:12 PM
Response to Reply #1
2. Your directions are better than Lowes website
and my handy Time Life book. I'm going to be trying this project this summer and I'm going to use your directions!! I successfully removed and installed 2 toilets so I'm ready for the next level. Thanks!
Printer Friendly | Permalink | Reply | Top
 
SiouxJ Donating Member (1000+ posts) Send PM | Profile | Ignore Wed Apr-27-05 04:48 PM
Response to Reply #2
5. Now that I think about it, I've done a few toilets too
but it was a long time ago. I guess I have done a little bit of plumbing but sinks have always intimidated me.
Printer Friendly | Permalink | Reply | Top
 
SiouxJ Donating Member (1000+ posts) Send PM | Profile | Ignore Wed Apr-27-05 04:47 PM
Response to Reply #1
4. Awesome!
Thank you so much! Now that I know what is involved, I think I'll try it. Yeah, I was wondering about getting in under there. It does look like a challenge but that doesn't usually scare me off.

I'm going to go out and look for new fixtures tonight. I probably won't get to the installations until after I finish all the painting but I'll let you know how it goes.

Thanks again so much!!

:yourock:
Printer Friendly | Permalink | Reply | Top
 
Warpy Donating Member (1000+ posts) Send PM | Profile | Ignore Wed Apr-27-05 09:02 PM
Response to Reply #1
7. I'll add to H2S's description that you may need a tool
called a "universal faucet tool," one that is specifically designed to get into those really tight spaces under all sorts of sinks and disconnect/reconnect the faucets. Most big building supply places or plumbing supply places will sell the tool, and it's not terribly expensive.

I'm surprised I didn't peel all the paint off my walls with my verbiage before I found that particular gadget years ago.

Printer Friendly | Permalink | Reply | Top
 
Stinky The Clown Donating Member (1000+ posts) Send PM | Profile | Ignore Wed Apr-27-05 09:21 PM
Response to Reply #7
8. Warpy, thanks!
:hi:

After that long post, my brain was hurting :)
Printer Friendly | Permalink | Reply | Top
 
SiouxJ Donating Member (1000+ posts) Send PM | Profile | Ignore Fri Apr-29-05 09:00 AM
Response to Reply #7
10. Thanks
That's something I wouldn't have thought of.
Printer Friendly | Permalink | Reply | Top
 
China_cat Donating Member (1000+ posts) Send PM | Profile | Ignore Wed Apr-27-05 04:04 PM
Response to Original message
3. The instructions you got are fabulous.
But I'll add that doing this is so easy that my husband did it last weekend. In the afternoon. And we had water before evening. Now that may not sound like such an accomplishment but when you consider that this is the man who took 15 years to put up a tub surround (no, that is not a typo, the word is YEARS), promised me no more than an afternoon without water to hook up a hot water stream in my shop and we ended up taking showers at the neighbors for 3 weeks and still has not installed the garbage disposal after almost 6 years of it sitting in the box...well, you can understand just how easy new faucets really are.

Printer Friendly | Permalink | Reply | Top
 
SiouxJ Donating Member (1000+ posts) Send PM | Profile | Ignore Wed Apr-27-05 04:48 PM
Response to Reply #3
6. Thanks for the encouragement
I think I'm going to go for it :-) .
Printer Friendly | Permalink | Reply | Top
 
GOPisEvil Donating Member (1000+ posts) Send PM | Profile | Ignore Thu Apr-28-05 07:53 PM
Response to Original message
9. Hi there! I changed out my own sink.
If I can do it anyone can. You just disconnect the supply lines (after shutting off the water of course). There might be some clips holding the sink down, just take those off and the sink should pop out. If it was grouted, then you'll have to cut the grout and lift it out. Measure the new sink carefully, and get 4 1/2" centers on the new sink, unless you want to spend more $$ on the fixture. I found out the hard way.
Printer Friendly | Permalink | Reply | Top
 
SiouxJ Donating Member (1000+ posts) Send PM | Profile | Ignore Fri Apr-29-05 09:04 AM
Response to Reply #9
11. Hey you!
Well I'm thinking of just doing the faucets as my sinks match my tile pretty perfectly and it's not a commonly found sink color.

But this will help if I decide to do something like that in the future. Good for you for doing it yourself!

:hi:
Printer Friendly | Permalink | Reply | Top
 
DU AdBot (1000+ posts) Click to send private message to this author Click to view 
this author's profile Click to add 
this author to your buddy list Click to add 
this author to your Ignore list Thu May 02nd 2024, 04:10 PM
Response to Original message
Advertisements [?]
 Top

Home » Discuss » DU Groups » Home & Family » DIY & Home Improvement Group Donate to DU

Powered by DCForum+ Version 1.1 Copyright 1997-2002 DCScripts.com
Software has been extensively modified by the DU administrators


Important Notices: By participating on this discussion board, visitors agree to abide by the rules outlined on our Rules page. Messages posted on the Democratic Underground Discussion Forums are the opinions of the individuals who post them, and do not necessarily represent the opinions of Democratic Underground, LLC.

Home  |  Discussion Forums  |  Journals |  Store  |  Donate

About DU  |  Contact Us  |  Privacy Policy

Got a message for Democratic Underground? Click here to send us a message.

© 2001 - 2011 Democratic Underground, LLC