Photography
Related: About this forumEdit Challenge. Let's see how you handle this image. Nothing was done other
than resizing. You can do a little, or a lot, but please describe what was done.

 = new reply since forum marked as read
Highlight:
NoneDon't highlight anything
5 newestHighlight 5 most recent replies
= new reply since forum marked as read
Highlight:
NoneDon't highlight anything
5 newestHighlight 5 most recent replies
RC
(25,592 posts)
Auto Level - Default
Contrast enhancement Default
Sharpening - .3 radius 40%

alfredo
(60,071 posts)
justiceischeap
(14,040 posts)
Here's what I did:
Opened as Camera Raw
Adjusted Contrast, Highlights, Saturation, Vibrance, Clarity & Shadows
Opened in Photoshop
Duplicated the layer and set it to Overlay and adjusted to 25%
Merged the layers
Duplicated the layer again and set it to Multiply and adjusted to 45%
Merged the Layers
Duplicated once more
Grabbed the burn tool set at 12% exposure for shadows and went over the entire image
Set to burn tool to midtones, duplicated above procedure
Set the opacity to 40%
Merged the layers
Painted over with black brush (to create a mask) to desaturate most of the background and trees
Saved
Took me about 10 minutes
alfredo
(60,071 posts)It almost looks like you desaturated the dead tree.
justiceischeap
(14,040 posts)
ManiacJoe
(10,136 posts)Did a 1-pixel sharpen with Focus Magic.
Changed the white balance to a little cooler.
Increased the saturation with a little darkness.
Increased the contrast with just a little brightness.
Cropped off the left and right sides for a cleaner view.

alfredo
(60,071 posts)
BuddhaGirl
(3,601 posts)I used Photoshop cs5, then ran a "warming" action that I got from Totally Rad Actions. I'm not too familiar with Photoshop so I can't explain the editing steps - at present I tend to rely on actions, though I know I *should* learn the basics! 

ManiacJoe
(10,136 posts)BuddhaGirl
(3,601 posts)Totally Rad makes actions and Lightroom presets.
GetTotallyrad.com

MichaelSoE
(1,576 posts)alfredo
(60,071 posts)BuddhaGirl
(3,601 posts)thanks! 
MichaelSoE
(1,576 posts)
1. duplicated original to a new layer
2. added a curves adjustment layer. increased the contrast
3. merged and stamped all layers
4. created a new layer, overlay mode, filled with neutral gray
5. using black to burn and white to dodge, on the overlay layer i burned the plants (brush set at 16% opacity) and that white piece of wood, dodged the dead tree
6. i then merged all the layers except the original. lowered the opacity to 76%.
7. the shadows at the bottom of the dead tree had no detail so i used an eraser set to 15% opacity to reveal more of the original layer.
8. I then upload the picture and started to type when I noticed that all the wood and ground seemed too reddish for my liking so reopened the picture, applied a hue and saturation adjustment layer and desaturated the reds a bit.
9. flattened the image, uploaded and finished typing this.
10. checeked preview but not spell check check.
11. clicked post my reply!
alfredo
(60,071 posts)MichaelSoE
(1,576 posts)alfredo
(60,071 posts)was about all I used.
rdking647
(5,113 posts)1. used aperture to adjust the levels
2. used nix software color efex 4 i applied the geyser sunset recipe
3. lowered the saturation
4. raised the contrast
[url=http://www.flickr.com/photos/rdking647/8681504597/][img] [/img][/url]
[url=http://www.flickr.com/photos/rdking647/8681504597/]73939_10151404104007862_1383369827_n[/url] by [url=http://www.flickr.com/people/rdking647/]rdking647[/url], on Flickr
alfredo
(60,071 posts)the colors I remember on that silver screen.
The movies influence how I look at photography. I spent many happy hours sitting in a dark room watching moving images on the wall.

Stevenmarc
(4,483 posts)Used Snapseed to selectively adjust ambience and saturation
Then Dynamic Light to create a layer with their Orton Effect filter
Then into Blender to blend the Snapseed and Dynamic Light Layers with a multiply blend mode
Then back to Snapseed to apply a tilt shift blur.

alfredo
(60,071 posts)Stevenmarc
(4,483 posts)That's where I was going with it.
alfredo
(60,071 posts)Stevenmarc
(4,483 posts)Used an app called Romantic Photo to create a darker version with a dappled sunlight effect on top of the previous photo.

alfredo
(60,071 posts)
Celebration
(15,812 posts)
Cut it to concentrate on upper right, simplifying the photo a bit, and then used PhotoDirector and performed the following actions
First warmed it up a but
Temperature 8
Tint 46
Tone--increased black level, decreased exposure
Exposure -0.73
Black level 100
Tinge--reduced clarity, vibrancy and saturation
Clarity -20
Vibrancy -78
Saturation -54
Reduced details
Luminance 100
Detail 56
Vignetting Effect-use this on many photos
Shade -87
Size 0
Feather 100
alfredo
(60,071 posts)
Mz Pip
(27,435 posts)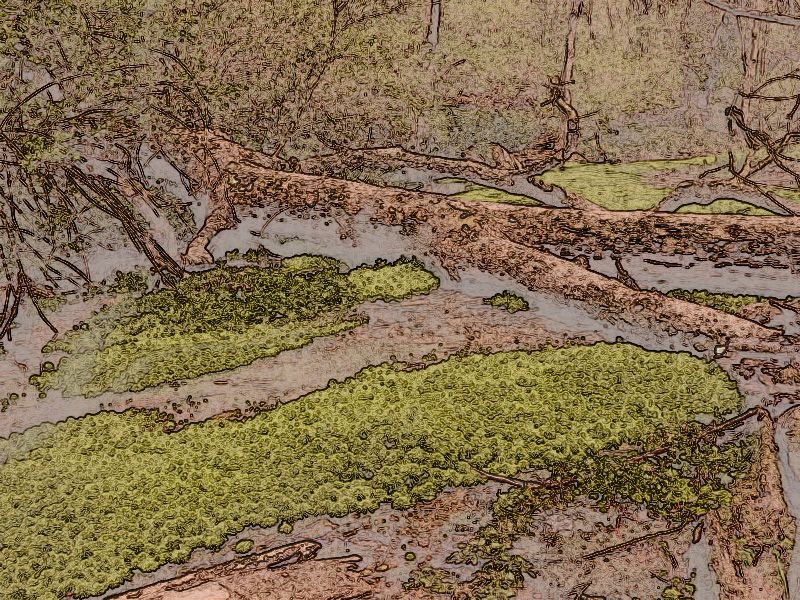
Opened in Photoshop CS5
Made duplicate image.
Used "Find Edges" filter on duplicate copy.
Used "Luminosity" blending mode.
Opacity decreased to 60%
On bottom original layer
Lowered Brightness to -3 and Contrast to -30
Color balance - Cyan/Red +5, Magenta/Green - 22, Yellow/Blue -38
Hue -4
Saturation -36
Flattened image.